Quick and Easy Flaky Pie Crust
Make this Flaky Pie Crust in your food processor with 3 simple ingredients in about 15 minutes! Homemade pie crust has never been easier and it is freezer friendly!
A few years ago I was insanely intimidated by making homemade pie crust, and stuck to graham cracker crusts only, thank you very much.
That changed after I went to cooking school and made homemade pie crust countless times. I can honestly say I have no idea why I was so intimidated.
Pie crust is easy!
If pie crust intimidates you, you’re in the right place. I’ll show you how to make this flaky pie crust recipe with 3 simple ingredients in about 15 minutes.
And we’re making it in a food processor, so it’s even easier. 🙂
If you’re looking for an easy press-in crust, be sure to try my pate sucree recipe! It’s a sweet tart dough that’s reminiscent of shortbread!
Why you’ll love this recipe
- This homemade pie crust is buttery, flaky and fresher tasting than anything that you can buy at the store.
- It comes together in 15 minutes in a food processor.
- It includes just 3 simple ingredients.
- Recipe includes make ahead and freezer tips!
Pie crust ingredients
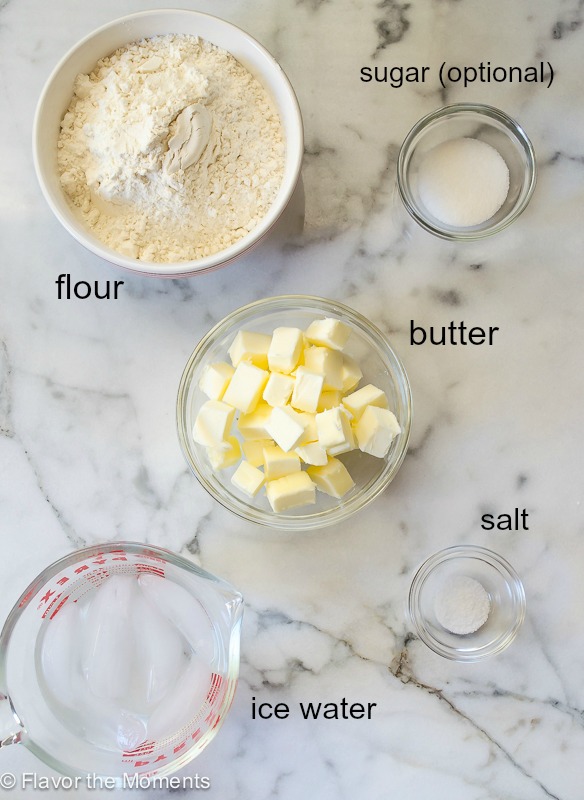
- Flour. You’ll need 1 1/4 cups of all purpose flour for (1) 9″ pie crust.
- Sugar. Add 1 tablespoon of sugar for a sweet pie, or omit the sugar for a savory pie.
- Salt. Add a pinch of sea salt as this recipe calls for unsalted butter. If using salted butter, omit the added salt.
- Butter. Make sure your butter is very cold and cut into small cubes. Cold butter ensures that the pie crust is nice and flaky!
- Ice water. You’ll need 3-5 tablespoons of ice water. Start with 3 tablespoons, then add 1 additional tablespoon at a time until the dough is cohesive.
See the recipe card below for the full list of ingredients and quantities.
How to make homemade pie crust
This homemade pie crust is buttery, flaky and better than anything that you can buy at the store. It includes 3 simple ingredients (plus ice water!), and comes together in 15 minutes in your food processor.
Pro tip: Always start with the minimum amount of water, and add only 1 more tablespoon at a time until the dough is cohesive.
See the recipe card below for full instructions.
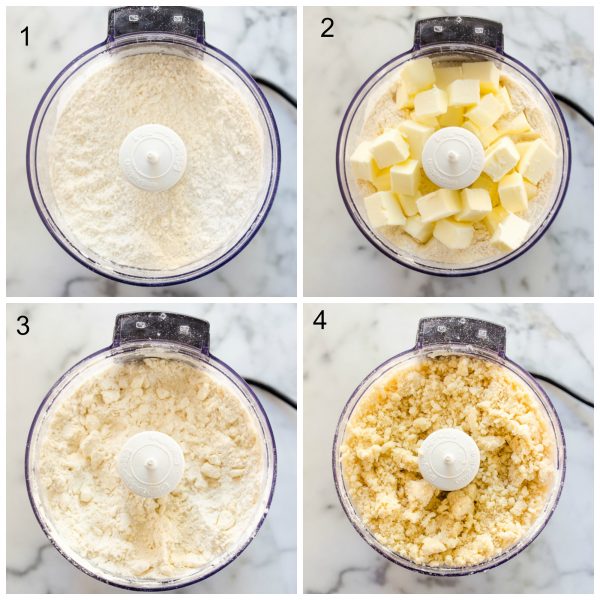
- Place the flour, sugar, and salt in the bowl of the food processor and pulse about 5 times to combine (Figure 1).
- Add the cubed butter (Figure 2), and if you’re butter is frozen, you’ll have even better results. Pulse in short, quick pulses (do not process!) until it resembles coarse meal or peas as shown in Figure 3. You want to see clumps of butter — that’s a good thing.
- Add 3 tablespoons of water through the feed tube while pulsing in short, quick pulses once again. Be careful not to pulse too much — just until the water is incorporated.
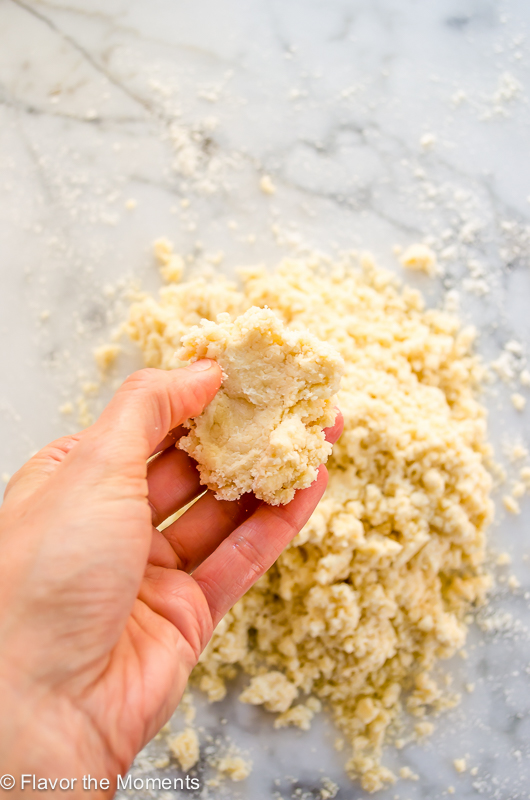
- Remove the lid and check the dough. If you can pinch it together and it holds, it’s fine. If it’s still dry, add 1-2 tablespoons more, 1 at a time, incorporating it with short, quick pulses once more, until it’s cohesive as shown in Figure 4.
As you can see from the photo below, the crust holds together nicely and is not too wet.
Form the dough into a disc and roll
Once the dough is ready, knead it together and form it into a flattened disk, then you can freeze it or chill it and roll it out.
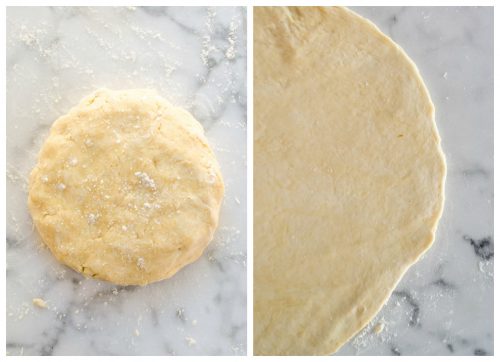
- Turn the dough out onto your work surface, and knead it together with your hands and form it into a disc. Wrap it in plastic wrap, and chill the dough for about 30 minutes prior to rolling to relax the gluten and chill that butter back up. From here, it can also be frozen for later use.
- Once chilled, unwrap the dough and place on a lightly floured work surface. Sprinkle the dough and coat the rolling pin with a light dusting of flour, and roll the dough out from the middle to the outer edge, going in about 10 minute intervals clockwise. After every couple of rolls, make sure to lift the dough and sprinkle more flour underneath to prevent sticking. If the dough does stick, scrape any bits of dough from your work surface as it’s a magnet for even more sticking. Roll the dough until it’s large enough to hang over the edge of your pie pan by a couple of inches.
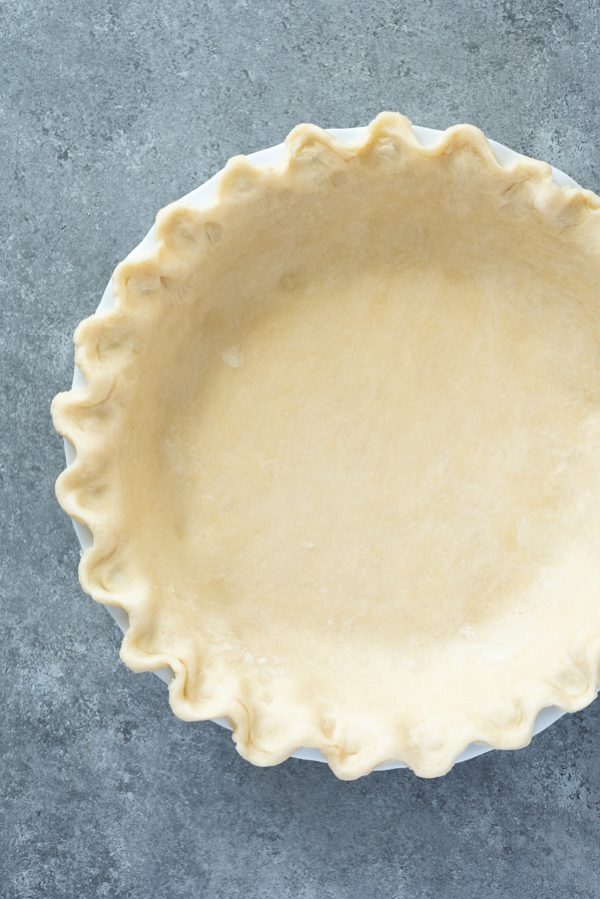
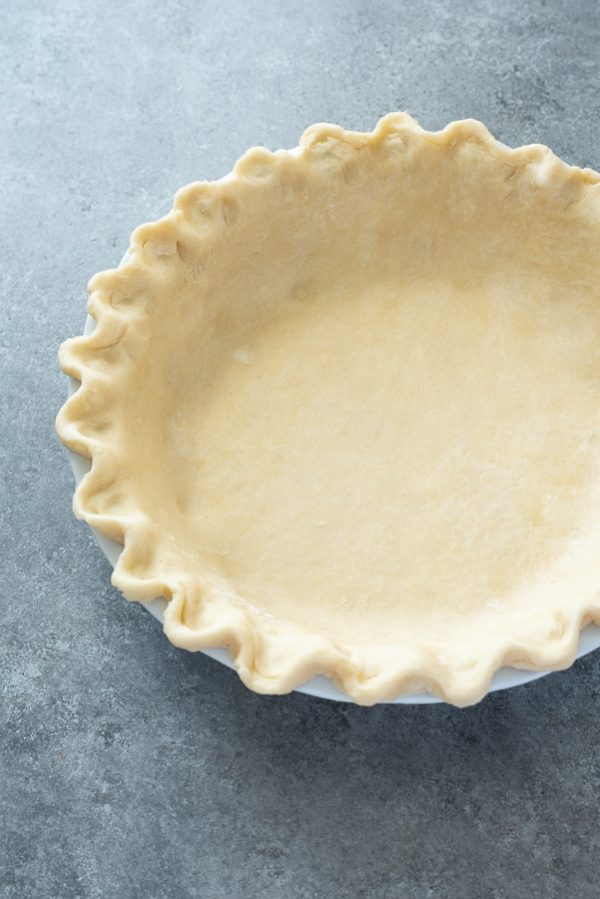
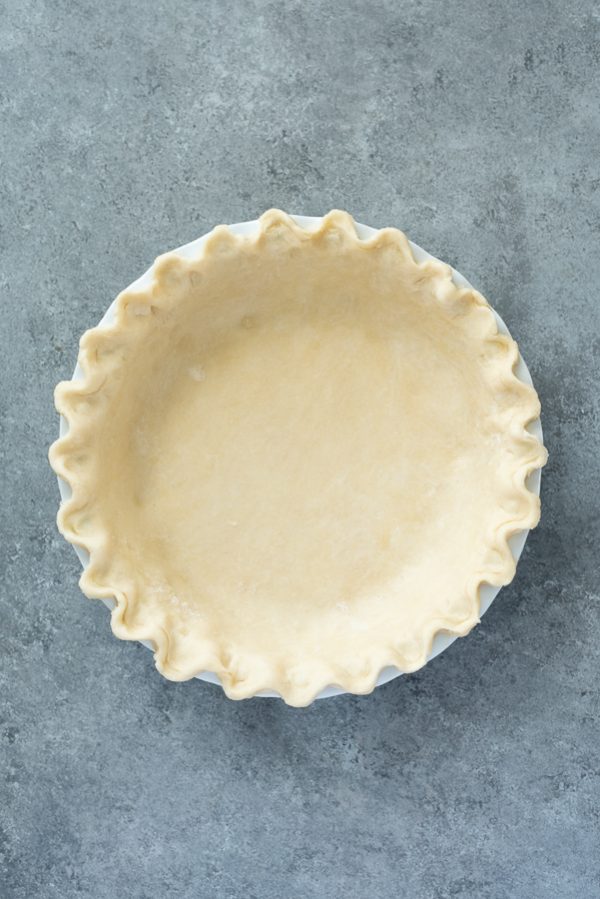
Place the dough in the pie plate and crimp
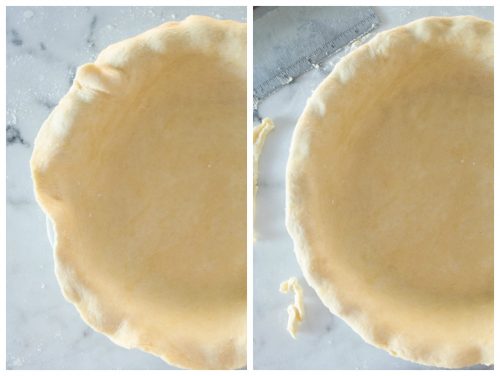
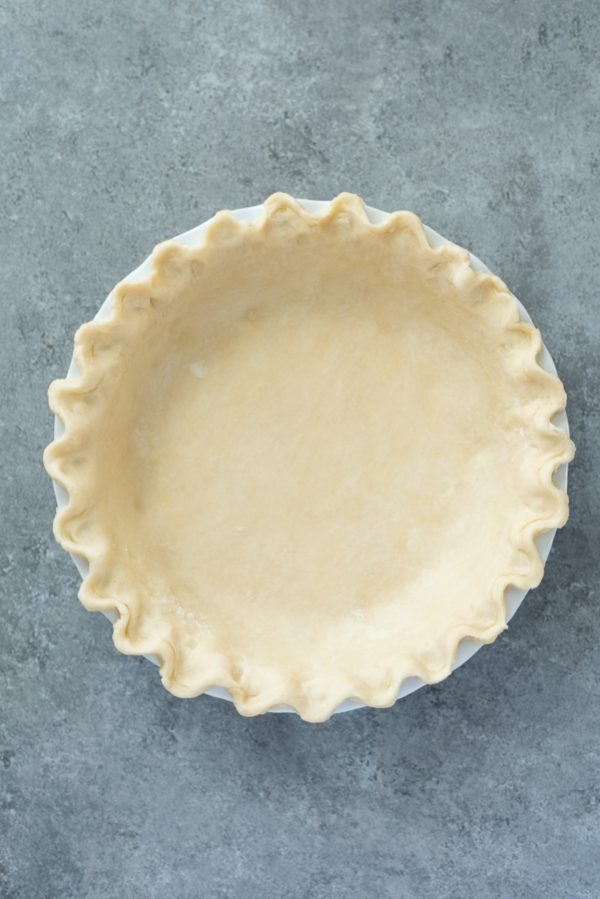
- Once the dough is large enough, use your rolling pin to gently roll the dough around it, and unroll it right into your pie plate. Tuck it gently into the inside “edges” of the pie pan, then use a bench scraper or knife to trim the edges around the top of the pie. Leave about an inch or so of dough over the edge as the dough will shrink a bit.
- From there, crimp your edges as best as you can (I’m far from perfect!), or use the scraps to cut out decorative shapes.
Recipe FAQs
For best results, pie crust must chilled. Chilling the dough allows the gluten strands to relax and the butter to stay cold, which is essential for a flaky pie crust.
Turn your chilled pie crust out onto a lightly floured work surface. Rolling the dough on a silpat mat, marble board or even parchment paper will help prevent the dough from sticking.
Roll from the middle outward, turning the dough in 10 minute increments like a clock, dusting with flour underneath as needed.
The dough should be about 1-2″ wider in circumference than your pie plate.
If your pie crust is crumbly and hard to roll, it’s lacking moisture. Try sprinkling a small amount of water over the pie dough and work it in as gently as possible to prevent overworking the dough.
Pie crust shrinks if the gluten hasn’t been given time to relax. To prevent your flaky pie crust from shrinking, chill the dough for 15 minutes after rolling it out.
I typically prepare my pie filling while my pie dough is in the refrigerator chilling.
Recipe notes
- Pro tip: Always start with the minimum amount of water, and add only 1 more tablespoon at a time until the dough is cohesive.
- Make this flaky pie crust 1-2 days in advance and store in the refrigerator wrapped tightly in plastic wrap. Let stand at room temperature until it’s just soft enough to roll.
- Pie dough may be frozen immediately after preparing it. Form it into a flattened disc and wrap it tightly in plastic wrap, then wrap it in foil. You may also freeze it in a plate that is freezer safe, wrapped in plastic wrap and foil. Thaw in the refrigerator over night before using.
- Yields (1) 9″ pie crust. Recipe is easily doubled for a double crust pie.
More pie recipes you’ll love
Did you try this recipe? If so, be sure to leave a review below and tag me @flavorthemoments on Facebook and Instagram

Quick and Easy Flaky Pie Crust
Ingredients
- 1¼ cups all purpose flour plus more for flouring your work surface
- 1 tablespoon granulated sugar omit for a savory pie
- ⅛ teaspoon salt
- 4 ounces unsalted butter cut into small cubes (freeze the butter cubes for 20-30 minutes prior to use for best results)
- 3-5 tablespoons ice water*
Instructions
- Place the flour, sugar, and salt in the bowl of your food processor and pulse about 5 times until combined. Add the cubed butter and pulse in short, quick pulses (do not process!) until it resembles coarse meal or peas. You want to see clumps of butter — that’s a good thing.1¼ cups all purpose flour, 1 tablespoon granulated sugar, ⅛ teaspoon salt, 4 ounces unsalted butter
- Add 3 tablespoons of water through the feed tube while pulsing in short, quick pulses once again. Be careful not to pulse too much — just until the water is incorporated. Remove the lid and check the dough. If you can pinch it together and it holds, it’s fine. If it’s still dry, add 1-2 tablespoons more water, 1 tablespoon at a time, incorporating it with short, quick pulses once more, until it’s cohesive.3-5 tablespoons ice water*
- Turn the dough out onto your work surface, and knead it together with your hands and form it into a disk. Wrap it in plastic wrap, and chill the dough for about 30 minutes prior to rolling to relax the gluten and chill that butter back up!
- Once chilled, unwrap the dough and place on a lightly floured work surface. Sprinkle the dough and flour your rolling pin, and roll the dough out from the middle to the outer edge, going in about 10 minute intervals clockwise around to form a circle. After every couple of rolls, make sure to lift the dough and sprinkle more flour underneath to prevent sticking. If the dough does stick, scrape any bits of dough from your work surface as it’s a magnet for even more sticking.
- Roll the dough until it’s large enough to hang over the edge of your pie pan by a couple of inches. Once it’s large enough, use your rolling pin to gently roll the dough around it, and unroll it right into your pie plate.
- Tuck the dough gently into the inside of the pie pan, then use a bench scraper or knife to trim the edges around the top of the pie. It’s ok to leave a little extra for crimping, etc. as the top does shrink a bit.
- From there, crimp your edges as best as you can, or use the scraps to cut out decorative shapes.
Video
Notes
- Pro tip: Always start with the minimum amount of water, and add only 1 more tablespoon at a time until the dough is cohesive. The amount of water you need will vary.
- Make this flaky pie crust 1-2 days in advance and store in the refrigerator wrapped tightly in plastic wrap. Let stand at room temperature until it’s just soft enough to roll.
- Pie dough may be frozen immediately after preparing it. Form it into a flattened disc and wrap it tightly in plastic wrap, then wrap it in foil. You may also freeze it in a plate that is freezer safe, wrapped in plastic wrap and foil. Thaw in the refrigerator over night before using.
- Yields (1) 9″ pie crust. Recipe is easily doubled for a double crust pie.
Nutrition
Nutrition is estimated using a food database and is only intended to be used as a guideline for informational purposes.

54 Comments on “Quick and Easy Flaky Pie Crust”
I don’t have a food processor so does that matter?
You can certainly prepare this without a food processor. Simply cut in the butter with a pastry blender, two forks or your fingers until it resembles pea-sized chunks. You should still see chunks of butter. Add the ice water and mix with your hands just until the dough holds together as stated in the recipe.
I love this pie crest recipe! Now I am not afraid to make my own crust!
I’m so happy to hear this Lorraine! Thank you for sharing this with me. 🙂
I was so intimidated by making a pie crust but this is so easy and turned out flaky and delicious. My go to from now on. Thank you.
I’m so glad that this recipe was a big success for you Elizabeth! And thanks so much for your review. 🙂
Easy as pie? mine would not roll out it kept cracking. I finally gave up, cut it into pieces and pressed it into my pie pan. I have a feeling it’s going to taste very good.🤷🏻♀️
Hi Kat. It sounds like the dough was too dry/cold if it was cracking. Maybe you didn’t add enough water or you used to much flour during rolling? The dough also rolls much better when it softens at room temperature for a bit. I hope it works out for you!
This is the easiest pie crust that I’ve ever made. It’s so good!
I’m so glad you love it!
The dough was buttery and flaky but I used twice the amount of water the recipe ordered amount. I live in the high dessert so it’s dry here that may be the cause .since I noticed other pie dough recipes used more water to become a cohesive dough. All cakes take longer to bake I even bought a new stove blaming the old stove for being off temperature.
I’m thinking the dry weather must’ve been the cause of the dough needing so much water. Thanks for letting me know your experience and I’m glad the pie dough worked out for you!
Can unsalted butter and salt be replaced with salted butter and omit salt?
Absolutely — simply omit salt and use salted butter.
I made this recipe with high hopes and followed the instructions to the letter. I made tarts and when they came out the muffin tin was full of the crust. None stayed stuck to the filling except the very bottom. All the sides were in crumbs in the muffin cups.
I’m sorry to hear that your tarts didn’t work, but I’m wondering if you added too much flour when you rolled out the dough as it sounds like it must’ve been dry to crumble on the sides. This recipe has received great reviews over the years so I’m confident that something went wrong somewhere.
I think this Recipe is 5 star. I hope to more recipe.
This was so easy to make and turned out perfect. I have always used store bought crusts but never again.
I’m glad this recipe worked out for you and thanks so much for taking the time to leave a comment and rating!
I just made this recipe. I don’t see anywhere what temperature and time to bake this?
Hi Karen. This is simply a pie crust recipe, so there is not info on how to bake it. The info on how to bake it would be included in a pie recipe, such as my pumpkin pie. I hope that helps!
What do you mean by 10 minute intervals. That a long time.
Sorry for the confusion — I mean to roll the dough out from the middle out to the edge, going around clockwise the distance the size of “10 minute” intervals — like the 10, 20 and 30 minute mark on the clock, etc. Does that make sense?
I have a sensitivity to wheat and gluten. Spelt flour works better for me. Could this be adapted to use spelt flour or gluten-free flour?
Thanks,
Patricia
Hi Patricia! I’ve never tried this with gluten-free or spelt flours so I’m not sure if it would work. I’d try searching the internet for a gluten-free or spelt flour crust…I wish I could help!
just found this; after so many friends swearing that homemade pie crust was easier. they would show me how and they would end up with a brick. tried this and it was so easy. thanks!!
I’m so happy to hear that you had pie crust success Annie! Thank you for taking the time to leave your feedback too!