Red Velvet Sandwich Cookies
Red Velvet Sandwich Cookies taste like cake mix cookies but they’re homemade. They’re soft and chewy, with a luscious cream cheese frosting, and they get rave reviews every time!

I think you all know that I’m a red velvet fanatic by now. Normally I steer clear from food coloring, but somehow it seems ok in order to achieve a beautiful red hue that’s perfect for Valentine’s Day and Christmas.
Red happens to be my favorite color, too. 🙂
I fell head over heels for red velvet cupcakes many years ago, and they’ve inspired me to create more tasty treats including red velvet brownies.
These Red Velvet Sandwich Cookies are one of my favorite recipes to make for the holidays. Most of the red velvet cookies I’ve tried in the past were made from a cake mix, but it was important to me to make this recipe completely from scratch as I try to use processed ingredients as little as possible.
I worked hard on this recipe, and I’m so happy with the results. These cookies are soft like cake mix cookies, with just the right amount of crispness.
They couldn’t be easier to make either, and they taste just like red velvet cake.

Recipe ingredients
There are only a few simple ingredients in this recipe
- All purpose flour
- Unsweetened cocoa powder
- Baking soda
- Butter, softened
- Granulated sugar
- Egg
- Vanilla Extract
- Red gel paste or food coloring
- Cream cheese, softened
- Powdered sugar

How to make red velvet cookies
Pro tip: It’s essential that the butter is softened and all of the ingredients have been gathered before getting started as this recipe goes quickly.
Prepare the cookie dough:
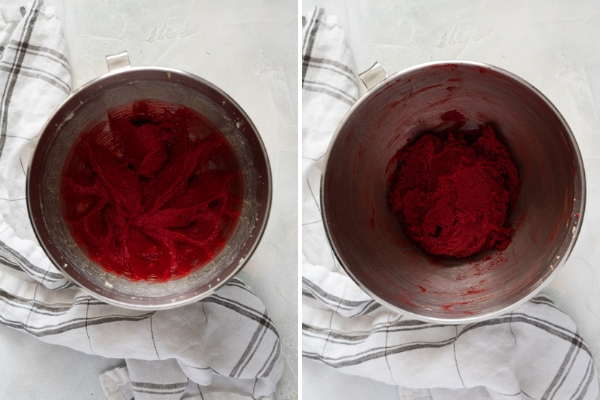
- Whisk together the flour, cocoa powder, baking soda and salt in a medium bowl and set aside. Beat the butter and sugar together at medium speed until light and fluffy, about 3 minutes. Scrape down the sides of the bowl and add the egg, mixing on low just until combined, then beat in the vanilla and red food coloring until well incorporated.
- Add the dry ingredients and beat on low just until combined, scraping down the sides of the bowl as necessary. Chill the dough for a minimum of 30 minutes.
Bake the red velvet cookies:
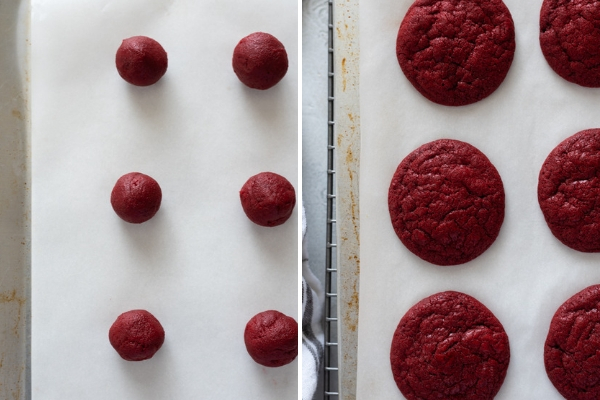
- Form about 1/2 tablespoon of dough into a ball and place on the prepared baking sheet. Repeat with the remaining dough and place 2″ apart.
- Bake on the middle rack of the oven for 6-8 minutes or until the cookies appear dry on top.
Prepare the cream cheese frosting and assemble the cookies:

- Prepare the frosting according to instructions in my cream cheese frosting recipe.
- Pipe or spread the frosting on the bottom half of half of the cookies, then top with the other half.

Recipe notes
- If you’re looking for a grain and gluten free alternative, these red velvet macarons are the perfect solution. They’re crisp, chewy and taste just like red velvet cake!
- I used gel coloring paste for this recipe, which is linked below. I suggest starting with 1 tablespoon of coloring and adding more as desired.
- Store red velvet sandwich cookies in an air tight container in the refrigerator for up to one week.

More red velvet recipes you’ll love:
- Red Velvet Cake by Live Well Bake Often
- Red Velvet Brownies
Did you try this recipe? If so, be sure to leave a review below and tag me @flavorthemoments on Facebook and Instagram

Red Velvet Sandwich Cookies
Ingredients
- 1 1/3 cup all purpose flour
- 2 tablespoons unsweetened cocoa powder
- 1/2 teaspoon baking soda
- 1/8 teaspoon salt
- 1 stick unsalted butter softened
- 3/4 cup granulated sugar
- 1 large egg
- 1 teaspoon pure vanilla extract
- 1 tablespoons red gel paste or food coloring*
- cream cheese frosting
Instructions
Prepare the cookies:
- In a medium bowl, whisk together the flour, cocoa powder, baking soda and salt. Set aside.
- Place the butter and granulated sugar in the bowl of a stand mixer fitted with the paddle attachment. Beat on medium speed until light and fluffy, about 3 minutes. Scrape down the sides and add the egg, mixing on low speed until combined, then beat in the vanilla and red food coloring until well incorporated.
- Add the flour mixture and beat on low speed until just combined, scraping down the sides of the bowl as necessary. Chill the dough in the refrigerator for 30 minutes.
- Preheat the oven to 350 degrees. Line (2) rimmed baking sheets with parchment paper.
- Remove the chilled dough from the refrigerator. Scoop out about 1/2 tablespoon of the dough and roll into balls. Place the dough balls the prepared baking sheet 2" apart.
- Bake on the middle rack of the oven for 6-8 minutes, or until the cookies appear dry on top.
- Cool on a wire rack for 10 minutes, then remove the cookies from the pan and cool completely on the wire rack.
- Prepare the cream cheese frosting and spread or pipe the frosting onto half of the cookies. Top with the other half of the cookies and enjoy!
Notes
- Total time above includes the 30 minutes for chilling the dough, and cooling the cookies.
- *I used gel coloring paste for this recipe, which is linked below. I suggest starting with 1 tablespoon of coloring and adding more as desired.
- Cookies should be stored in an airtight container in the refrigerator for up to one week. Enjoy!
Nutrition
Nutrition is estimated using a food database and is only intended to be used as a guideline for informational purposes.
**The photos and text were updated in this post in January 2020.



54 Comments on “Red Velvet Sandwich Cookies”
I’m confused..the ingredients call for baking soda but the directions say baking powder. Which is it?
Hi, Amanda! So sorry about the confusion…it’s baking soda. Thank you for letting me know and I will fix it right now! 🙂
So, when exactly do you make the cookies red?
I’m very sorry that wasn’t included in the recipe, Rebecca — I’ve changed it to reflect the addition of the food coloring now. It’s added to the wet ingredients right after the addition of the egg. Thank you for bringing this to my attention!
Hopefully, you don’t mind helping me a little bit. I tried this recipe yesterday and it was a bit of a disaster which I’m positive was a problem on my end. The cookies were way too wet and wouldn’t cook all the way through. I probably could have added a little more flour, but the dough was already red. The filling was AMAZING, though and was a definite success. 🙂
Hi, Rebecca — I’m sorry the cookies gave you trouble! The dough is a bit sticky, but I find if I chill it, it’s completely workable. I actually used a small cookie scoop to scoop out the dough, then pop it out into my hand and roll it just a bit to smooth it. I’ve never had a problem with them not being cooked however. Hmmm…could your oven temperature be a bit off? I wish they had worked out for you!
Hi there! Is it ok if I put some milk in your recipe? What are the chances? I’ll definitely bake these goodies! Thanks!
Hi Grace! I haven’t tried this recipe with milk, so I don’t know how it would affect them. If you want to try it, I would suggest using a tablespoon or two of buttermilk since most red velvet recipes contain that, and it’s thicker. Let me know what happens! 🙂
These look perfect, Marcie….and the way you describe the cookie sounds amazing!! Thanks so much for sharing at Saturday Night Fever!!
Thank you for hosting, Cathy! 🙂
I love anything red velvet and I can never resist a sandwich cookie. These look amazing Marcie!
Thank you, Christin! I haven’t met anything red velvet that I didn’t like. 🙂
These are absolutely gorgeous!! They will be gone in a blink 🙂
Thanks, Zainab, and they were!
I love these Red Velvet sandwich cookies Marcie. A friend of mine just sent me whoppie pies from Pennsylvania. ANd I loved them. These remind me of those in many ways! They look delicious!!
Thank you, Renee! I’ve never had a whoopee pie, believe it or not, but I have a feeling they’re probably very similar! 🙂
We love red velvet and cream cheese. These look amazing! Pinning!
Thank you, Krystle, and I appreciate the pin! 🙂
These are so perfect for V-day! I know I wouldn’t be able to stop at one!
Thanks, Ashley, and I couldn’t stop at one either.
Thank you, Juliana! They’re perfect for me, cuz I’m a sucker for the color red.
Thank you, Consuelo! Next time it’s double stuff.
I love anything Red Velvet, they look delicious! I could eat a few of those right now 🙂 My kids are always asking for a Red Velvet cake with cream cheese icing!!
check out my recent post – Valentine Cheesecake with Strawberries! 🙂
This is the easiest way to deliver red velvet cake with cream cheese icing — hope you can give it a try. Thx Michael!