Protein Peanut Butter Cups


If you love chocolate and peanut butter, these Protein Peanut Butter Cups are an easy no-bake treat you can feel good about. They’re made with (5) simple real food ingredients, they have protein powder for a protein boost, and they come together in about 10 minutes!

There’s nothing better than the combination of chocolate and peanut butter where I’m concerned, and these Protein Peanut Butter Cups take the classic candy to the next level. They’re made with wholesome ingredients like dark chocolate, natural peanut butter, honey, and protein powder, so they’re a treat you can enjoy anytime.
The filling is soft, creamy, and satisfying, while the dark chocolate shell adds that perfect snap. A quick sprinkle of flaky sea salt ties it all together for a sweet and salty bite you’ll crave again and again.
These are easy enough for meal prep and store beautifully in the fridge or freezer, so you can keep a stash ready whenever your sweet tooth hits.
They’re so much better than Reese’s or other store bought brands. They’re not too sweet, and they have ingredients that you can pronounce. I for one will never buy peanut butter cups at the store again. 🙂
If you love protein snacks, be sure and try my peanut butter protein balls. They’re another easy no-bake snack that’s a good source of protein!

Why you’ll love this recipe
- These homemade peanut butter cups are an easy no-bake treat that’s rich, chocolatey and even more delicious than store-bought.
- They include just (5) simple real food ingredients, and they take 10-15 minutes to make.
- Protein powder and peanut butter make these a well balanced, satisfying treat.
- They keep for weeks in the refrigerator or months in the freezer.
Recipe ingredients
There are only (5) ingredients included in these dark chocolate peanut butter cups, not counting the flaky sea salt as that’s optional.

- Chocolate chips. I chose dark chocolate chips for these peanut butter cups as they provide deeper chocolate flavor and they’re much less sweet than semi-sweet or milk chocolate chips. You can certainly use your favorite variety. If you’re looking for dairy-free chocolate chips with no refined sugar, these Guittard dark chocolate chips are my favorite.
- Peanut butter. Crunchy or creamy peanut butter works in this recipe. Sub with sun butter or almond butter if you have a peanut allergy.
- Protein powder. I used vanilla whey protein for this recipe, which is linked in the recipe card below. Use your favorite brand, but note that the texture will vary slightly depending on which type that you use.
- Honey. A bit of honey adds subtle sweetness to the peanut butter filling. Sub with maple syrup or your favorite sweetener.
- Coconut oil. A tablespoon of coconut oil is important to soften the chocolate so it’s not too hard to bite into, and it thins out the chocolate and makes it pourable as well. Sub with butter if you like.
- Flaky sea salt. Just a sprinkle of flaky sea salt on these peanut butter cups heightens the chocolate flavor and balances out the sweetness. It’s totally optional!
See the recipe card below for the full list of ingredients and quantities.
How to make homemade peanut butter cups
Making homemade peanut butter cups is very easy and even fun! They take about 15 minutes to assemble — the hardest part is waiting for them to set. 🙂
Pro tip: I used vanilla whey protein, but any type of protein powder will work. Keep in mind that the texture of protein powders vary, so the texture of the filling will depend on which type you use.
See the recipe card below for full instructions.


Recipe FAQs
Whey, collagen, or plant-based protein powders all work well in these protein peanut butter cups.
Vanilla or unflavored protein powder blends seamlessly with the peanut butter and honey. Avoid overly chalky or gritty protein powders for the best texture.
The protein powder helps solidify the peanut butter filling, so if you choose not to use it, the peanut butter will be soft and runny.
There are other ways to thicken the filling, however, including a tablespoon or two of almond flour or coconut flour.
The coconut oil helps thin the chocolate so it coats the filling smoothly, and softens the chocolate so that it’s not too hard. If you don’t have coconut oil, feel free to swap it out with melted butter.
Keep them in an airtight container in the refrigerator for up to 2 weeks. For longer storage, freeze them for up to 3 months and thaw at room temperature for a few minutes before enjoying.

Recipe notes
- Pro tip: I used vanilla whey protein, but any type of protein powder will work. Keep in mind that the texture of protein powders vary, so the texture of the filling will depend on which type you use.
- I used Guittard dairy-free chocolate chips made with coconut sugar. Sub with your favorite chocolate chips!
- If you’d like a softer peanut butter cup, leave it out at room temp for just a few minutes before eating.
- For best results, store peanut butter cups in an air tight container in the fridge for up to 2 weeks or freeze for up to 3 months.

Did you try this recipe? If so, be sure to leave a review below and tag me @flavorthemoments on Facebook and Instagram

Protein Peanut Butter Cups
Ingredients
- 1/2 cup creamy peanut butter
- 1/3 cup protein powder see note 1
- 2 tablespoons honey sub with maple syrup
- 1.5 cups dark chocolate chips about 9 ounces; see note 2
- 1 tablespoon melted coconut oil
- flaky sea salt, for sprinkling optional
Instructions
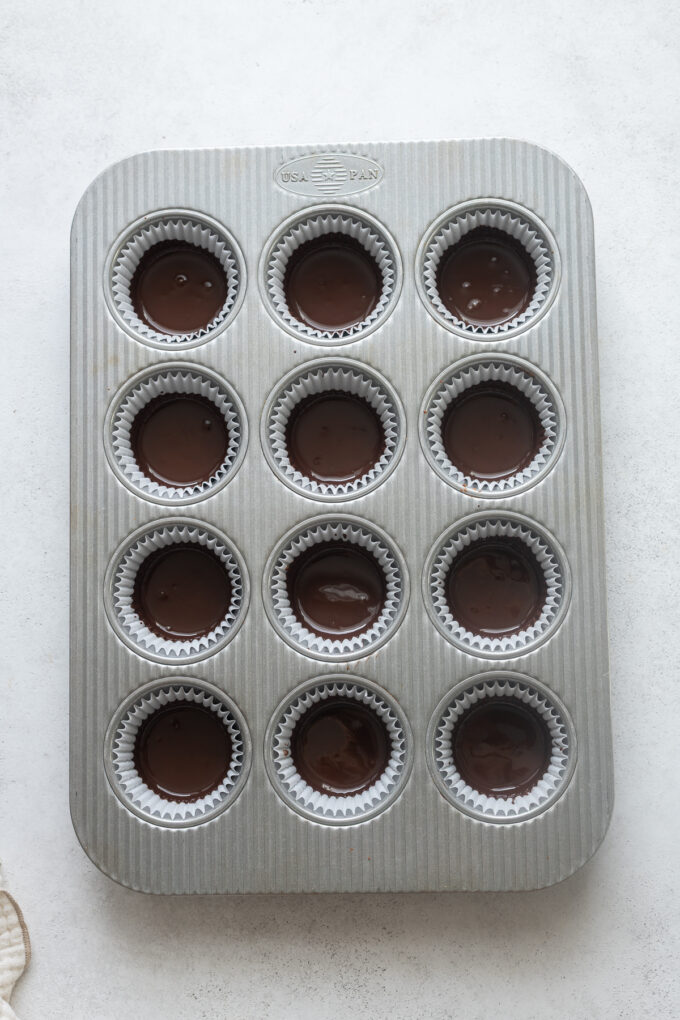
- Place (12) paper or foil liners in the cavities of a standard muffin tin.
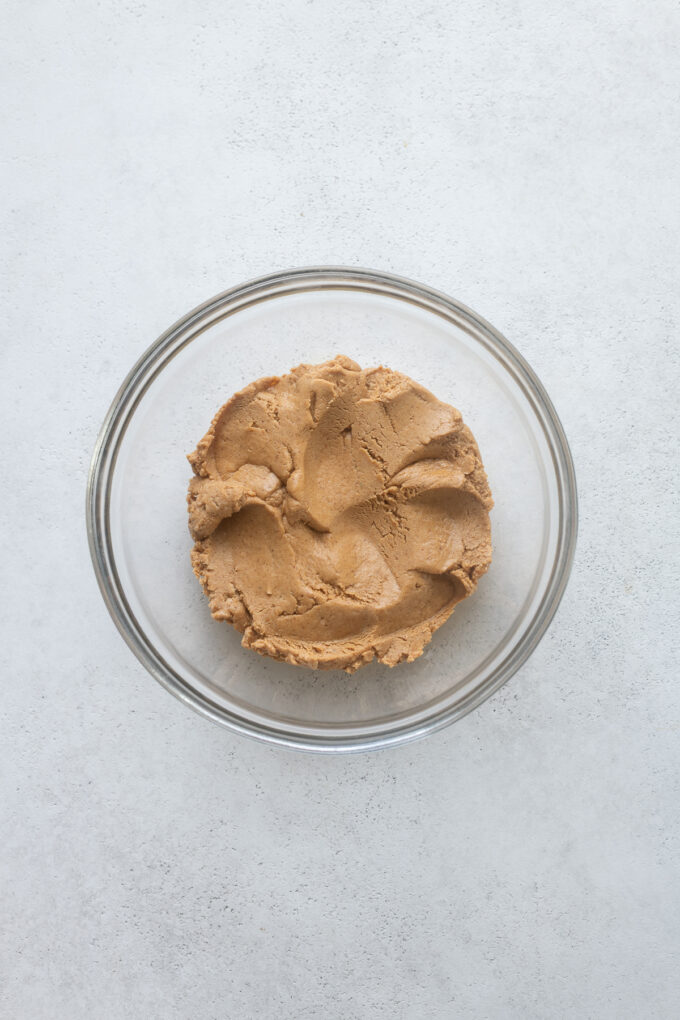
- Place the peanut butter, protein powder and honey in a medium mixing bowl and stir until no lumps of protein powder remain. You can also use a mixer to beat the ingredients until combined. The mixture will be a soft dough that is very easy to work with.1/2 cup creamy peanut butter, 1/3 cup protein powder, 2 tablespoons honey
- Form the peanut butter mixture into (12) flattened discs (about 1 tablespoon each) and set aside.
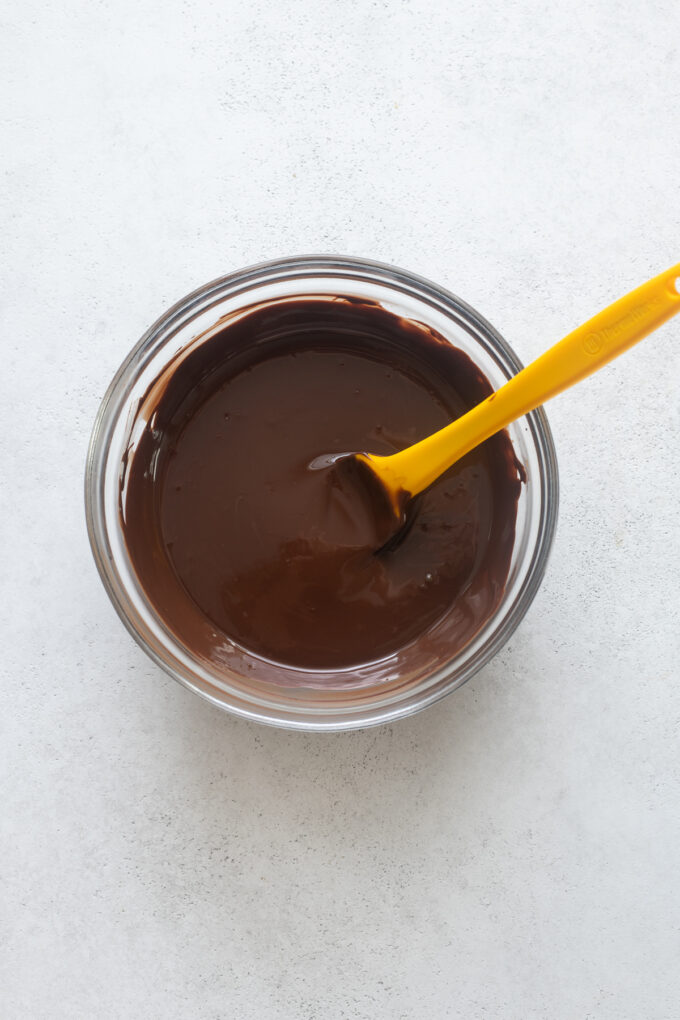
- Place the chocolate chips and coconut oil in a small microwave safe bowl and stir to combine. Microwave at 50% power for 1 minute, then stir, and microwave for 30 – 60 seconds longer and stir until the chocolate chips have completely melted.1.5 cups dark chocolate chips, 1 tablespoon melted coconut oil
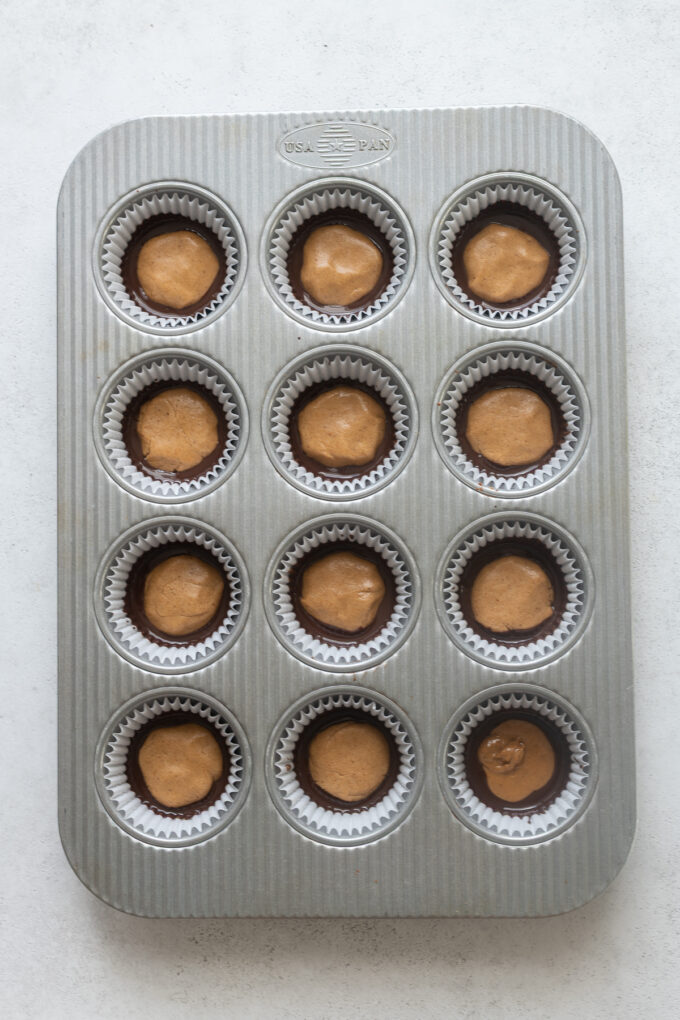
- Place 1 tablespoon of melted chocolate in the bottom of each paper lined muffin cup and spread the chocolate up the sides a bit. Place a peanut butter disc into the chocolate in each muffin cup, then drizzle about 1/2 tablespoon over the top of each peanut butter discs until completely covered. Sprinkle with flaky sea salt as desired and chill in the refrigerator for up to 3 hours or until set. Remove from the paper liners and enjoy!flaky sea salt, for sprinkling
Notes
- Pro tip: I used vanilla whey protein, but any type of protein powder will work. Keep in mind that the texture of protein powders vary, so the texture of the filling will depend on which type you use.
- I used Guittard dairy-free chocolate chips made with coconut sugar. Sub with your favorite chocolate chips!
- If you’d like a softer peanut butter cup, leave it out at room temp for just a few minutes before eating.
- For best results, store peanut butter cups in an air tight container in the fridge for up to 2 weeks or freeze for up to 3 months.
Nutrition
Nutrition is estimated using a food database and is only intended to be used as a guideline for informational purposes.

24 Comments on “Protein Peanut Butter Cups”
These look so delicious! I love making my own PB cups and these salted dark chocolate ones are so classy and gorgeous 🙂
Thank you so much, Medha!
You need to try it then Puja — thank you!
I actually love the oozy peanut butter in your pictures so I think your impatience paid off. They look incredible!
I didn’t get to eat any Halloween candy because we were too busy packing and moving but I would be just fine with a handful of these babies. I also love that they don’t call for added sugar or fat. You’re so right- PB and dark chocolate don’t need fixing! 🙂
Oozy peanut butter and dark chocolate could never be a bad thing, right? 🙂 Thanks, Sarah, and I hope your move went well!
These look absolutely incredible, Marcie! I love PB cups so much and this homemade version is deluxe!
Thank you so much, Alyssa! 🙂
Salted chocolate desserts are one of my biggest weaknesses, and why have I never added salt to my hot chocolate? I’m doing it this year! Thanks for the great idea, Vivian!
I’m not a big candy person either … except I do love peanut butter cups!! They were always my favorite growing up! These sound FANTASTIC!! Way better than the stuff I bought to give out to the kiddos tonight!
Thanks, Ashley! I almost feel bad passing out regular Reese’s to the trick or treaters tonight. 🙂
Yum, I could always go for a chocolate peanut butter cup! I actually made chocolate almond butter cups a few weeks ago for the first time… and I wouldn’t turn down those either 😉
Oh I wouldn’t turn down an almond butter cup either! haha Thanks Nicole!
Reese’s are my guilty pleasure. I could eat them all day every day! I could definitely use this recipe to make my addiction more healthy!
I’d eat these every day if they were around too — they were just calling my name! Thanks, Annie!
Hi Marcie, you are so right, when I made my own I added coconut oil and there really was no reason to. Love everything about these.
Thanks so much, Cheri!
Love PB cups! These look divine, Marcie. Loving the salted chocolate. I can’t wait to try making my own! 🙂
Thanks, Jess! There’s nothing like salted dark chocolate!
Your peanut butter cups make me wish I was home for Halloween.
Hopefully you have a wonderful Halloween wherever you are!
I usually don’t go out of my way to eat candy either, but I made the mistake of buying two big bags for the trick-or-treaters a few weeks ago, and they somehow opened and candy disappeared…oops! 🙂 I would much rather have this homemade version though. Looks incredible, Marcie! I love the salted dark chocolate in here. Just what I need for this Monday!
Disappearing candy usually happens to me! haha Thanks, Gayle, and Happy Halloween! 🙂
I’ve been wanting to make my own nut butter cups, but haven’t gotten around to it yet. Probably because they won’t look as perfect as these 😉 Happy Halloween, Marcie!
I thought these were quite imperfect really, but aren’t we always our own worst critic? 🙂 Thanks, Megan, and Happy Halloween!