How to Cut a Whole Chicken
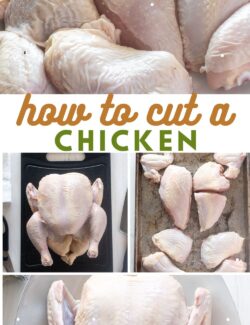
Learn How to Cut a Whole Chicken with my easy step by step instructions! All you need is a cutting board, knife, kitchen shears and about 10 minutes of time! Cutting a chicken yourself is so much more cost effective and it can be portioned out to use in a variety of recipes!
I use whole chickens a lot to prepare roasted chicken and spatchcock roast chicken, but sometimes I simply want to cut my whole chicken into pieces to use in a variety of ways.
Let’s face it, prices are very high right now, and knowing How to Cut a Whole Chicken is very handy because it’s a good skill to have AND it saves you money.
The price per pound is much less when you purchase a whole chicken, and you can cook it up in so many delicious ways.
I know cutting a whole chicken can seem daunting to some, but I promise that if you follow my instructions and keep practicing, you’ll have it down in no time and you’ll be surprised how easy it really is.
What’s even more surprising is that you can get the job done with a good, sharp pair of kitchen shears if you’re not comfortable using a big chef’s knife.
You got this! 🙂

Why you’ll love this recipe
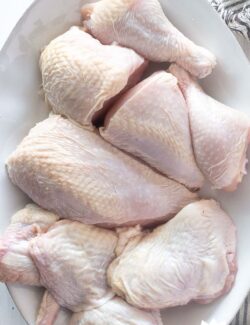
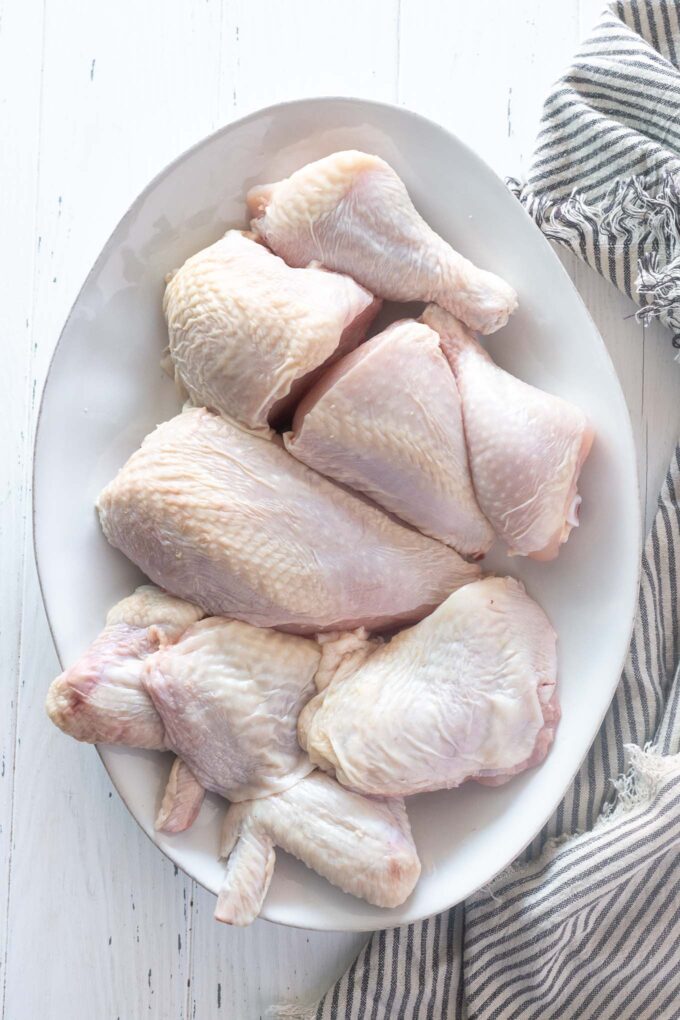
- In this tutorial, you’ll learn how to cut up a whole chicken in 8 pieces quickly and easily with just a few simple tools.
- Cutting a chicken takes about 10 minutes of time, and the more you do it the easier it gets!
- It’s extremely cost effective to cut a whole chicken yourself. Whole chickens are cheaper per pound than purchasing pre-cut breasts, thighs or drumsticks.
- You can portion your chicken parts out and use them a variety of ways. And you can save the backbone and neck to make chicken stock!
Recipe ingredients and tools
There is only one ingredient necessary for this recipe — a whole chicken! Cutting a chicken takes a few necessary tools, which are outlined below in the ingredient notes.
Ingredient notes
- Whole chicken. Any size whole chicken will do the trick here, so choose the size based on how many people you wish to feed or the type of recipes you’ll use it in. Consider purchasing a double pack of organic whole chickens at Costco and break them down at the same time. This saves money and time, and you can portion the chicken out for upcoming recipes.
- Cutting board. Use a non-skid cutting board to keep it from moving around. If you don’t have one, place a damp towel underneath your cutting board to keep it in place.
- Chef’s knife. Any standard chef’s knife will work great, just be sure that it’s nice and sharp.
- Kitchen shears. A sharp pair of kitchen shears can also help make this task easier, especially if you’re not super comfortable using a sharp chef’s knife. If you have a great pair of kitchen shears, you can get this entire job done with those.
How to cut a chicken
Cutting a chicken can be intimidating, but it’s very easy following these step by step by instructions. The more you do it, the easier it will get, and you’ll save a lot money over time doing it yourself.
Locating the various joints in the chicken is one of the most important things, as your knife will cut through them quickly and easily. If you’re having trouble making a cut, you are not cutting through the joint.
Pro tip: Use a very sharp knife for best results. If you’re not comfortable using a knife, kitchen shears are a great option as well!
See the recipe card for full instructions.
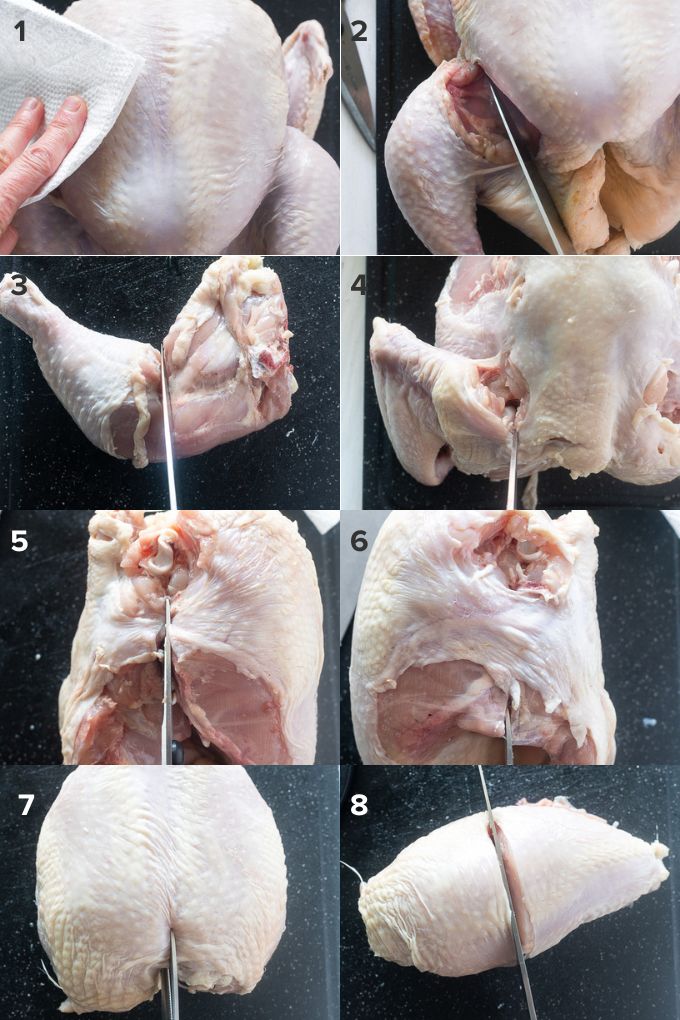
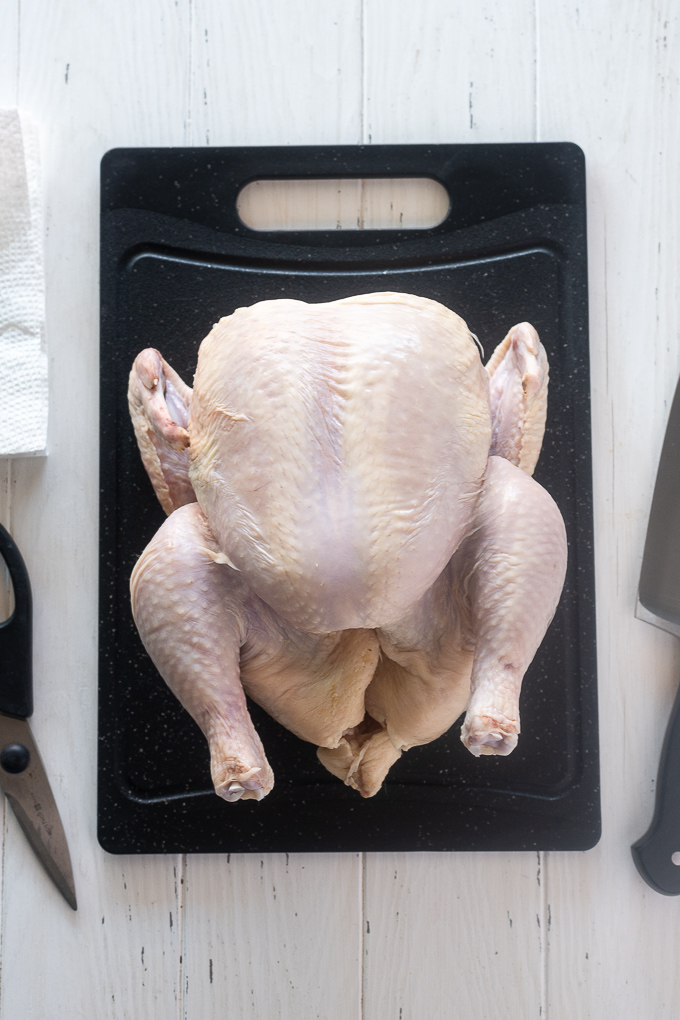
- Pat the chicken dry with paper towels.
- Remove the legs by cutting through the skin between the chicken breast and drumstick. Pull the leg slightly away from the body to expose the joint, then cut through the joint and through the bottom to release the leg. Repeat on the other side.
- Separate the drumstick and thigh. Place the leg and thigh on a cutting board skin side down, then find the joint where the top of the drumstick meets the thigh. Cut through the joint to separate the drumstick and thigh. Repeat the process for the second leg.
- Remove the wings. Locate the joint where the wing meets the breast. Pull the wing away from the body to expose the joint and cut through the joint with your knife or kitchen shears. Locating the joint is even easier if you turn the chicken breast side down on the cutting board. The entire wing can be removed using your kitchen shears, which gives you a bit more control if you lack experience. Repeat for the second wing.
- Separate the breast and backbone. Turn the chicken on its side and using kitchen shears, cut through the ribs to separate on one side.
- Repeat on the other side and save the backbone for stock.
- Split the breast. Place the chicken breast breast side down on a cutting board and make a shallow cut along the top and sides of the breast bone with a knife or paring knife to help loosen it. Turn the chicken over breast side up and press down to crack it. From there, cut through the middle of the breast to separate. You can also use kitchen shears to cut through the skin and breast to separate, then use the knife to cut through the breastbone.
- Cut the breasts in half (optional). Place the breasts skin side up on the cutting board and remove the bones if desired. Cut width-wise to create two half breasts. You can also remove the bones and remove the chicken tenders to save for another use.

Recipe FAQs
Cutting a whole chicken can be intimidating, but it’s very easy following these step by step photos and instructions.
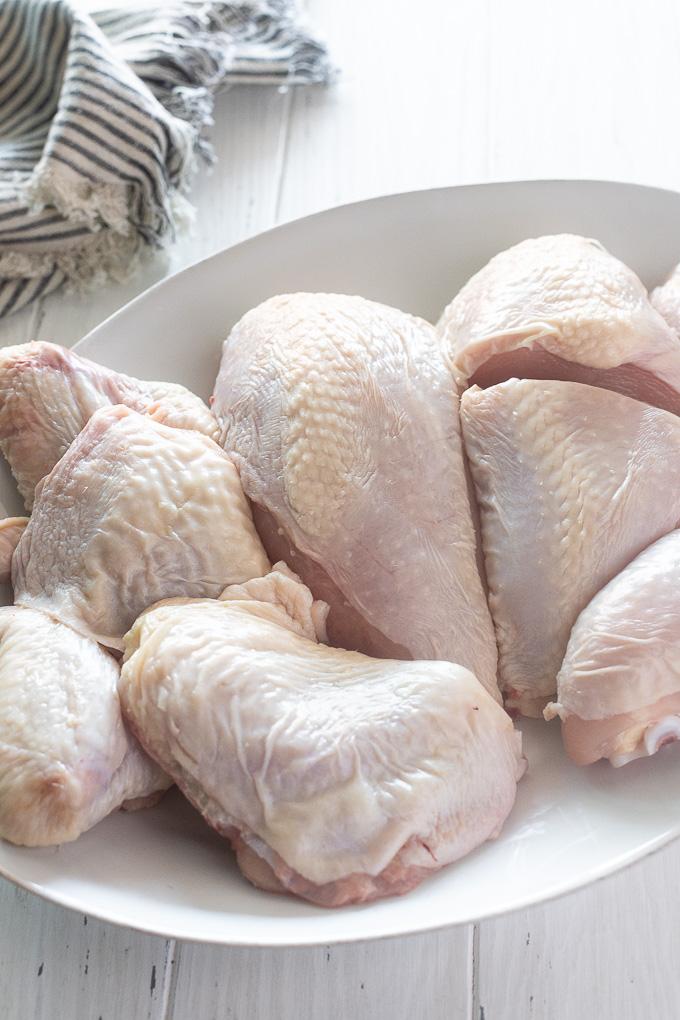
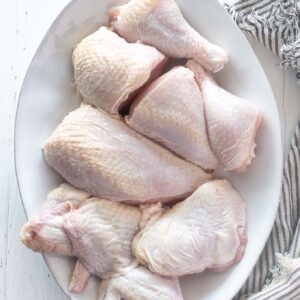
First, pat the chicken dry and place it breast side up on a non-skid cutting board. From there, cut it into 8 pieces. The pieces consist of (2) drumsticks, (2) thighs, (2) breasts and (2) wings.
1. Remove the legs.
2. Separate the drumstick and thigh by cutting through the joint.
3. Remove the wings by cutting through the joint.
4. Separate the breast from the backbone by cutting through both sides of the ribs with kitchen shears.
5. Make shallow cuts all along the breastbone, then place breast side up on a cutting board and using your hands, press down firmly to crack it.
6. Split the breast by cutting down through the middle.
A sharp chef’s knife or kitchen shears are the best tools to use when cutting up a whole chicken. Whether you’re experienced with a chef’s knife or not, kitchen shears work great as they give you even more control to cut exactly where you want to.
In my opinion, it’s even easier to remove the chicken wings using kitchen shears with the chicken is breast side down on the cutting board as it can be difficult to locate the wing joint.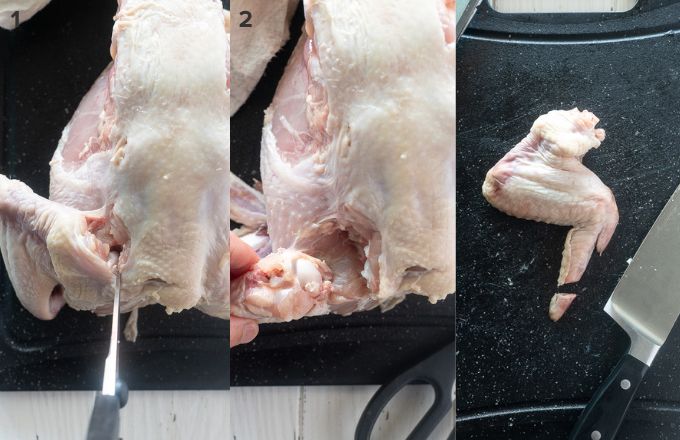
1. Turn the chicken breast side down on the cutting board, locate the joint, and cut through the wing to expose it.
2. Cut through the joint and around the wing to separate it from the body.
3. Cut the wing tips and save them for stock.
Once the breast has been separated from the backbone, it’s ready to be split in half. Place it breast side down, and cut along the breastbone with the tip of your knife, a paring knife or shears.
From there, place the chicken breast side up, and press down on the breast with your hands to crack it (I also use this technique in my post how to spatchcock a chicken, which helps the chicken lay flat). Once cracked, cut through the breast with a chef’s knife to separate it into half breasts.
You can also use kitchen shears to split the breast as well. 
1. Cut down the middle through the skin and the breast meat until you get to the breast bone.
2. Cut through the breast bone to split.
3. Leave the half breasts bone-in, or remove the bones.
Ways to use chicken
Once you’ve cut your whole chicken, the possibilities are endless on the ways you can use it!
- Put the entire chicken to use with this buttermilk fried chicken recipe by Fifteen Spatulas. Not a fan of frying? Try this recipe for oven fried chicken by Savory Nothings.
- Make a batch of grilled bbq chicken for your summer gatherings! This tutorial covers every cut of chicken.
- Use chicken thighs to make chicken stew or grilled chicken thighs. You can also use chicken thighs and drumsticks for Coq au Vin.
- Save your wings in freezer bags until you have enough for a batch of air fryer chicken wings!
- Use your chicken breasts to make Greek lemon chicken soup or baked salsa chicken. You can also use them to make Instant Pot shredded chicken or slow cooker bbq pulled chicken.
Recipe notes
- Pro tip: Use a very sharp knife for best results. If you’re not comfortable using a knife, kitchen shears are a great option as well!
- Consider purchasing a double pack of organic whole chickens at Costco and break them down at the same time. This saves money and time, and you can portion the chicken out for upcoming recipes.
- Store raw chicken in the refrigerator for up to 3 days or in the freezer for up to 3 months.
- Save the neck and backbone to make homemade chicken stock. Store them in zip top bags in the freezer for up to 3 months until you’re ready to make stock!

More chicken recipes you’ll love
Did you try this recipe? If so, be sure to leave a review below and tag me @flavorthemoments on Facebook and Instagram
How to Cut a Whole Chicken
Ingredients
- 1 whole chicken
Instructions
- Place the chicken breast side up on a cutting board. Remove the giblets packet and neck inside the cavity, if applicable, and pat the chicken dry with a paper towel.1 whole chicken
- Remove the legs. Cut through the skin between the chicken breast and drumstick and pull the leg slightly away from the body to expose the joint. Cut through the joint and through the bottom to release the leg. Repeat on the other side.
- Separate the drumstick and thigh. Place the leg and thigh on a cutting board skin side down. Find the joint where the top of the drumstick meets the thigh and cut right through the joint to separate the drumstick and thigh. Repeat the process for the second leg.
- Remove the wings. Locate the joint where the wing meets the breast. Pull the wing away from the body to expose the joint and cut through the joint with your knife or kitchen shears. Locating the joint is even easier if you turn the chicken breast side down on the cutting board…the entire wing can be removed using your kitchen shears, which gives you a bit more control if you lack experience. Repeat for the second wing. Remove the wing tips if desired and save for stock.
- Separate the breast and backbone. Turn the chicken on its side and using kitchen shears, cut through the ribs to separate on one side. Repeat on the other side and save the backbone for stock.
- Split the breast. Place the chicken breast breast side down on a cutting board and make a shallow cut along the breast bone with a knife or paring knife to help loosen it. Turn the chicken over breast side up and press down to crack it. From there, cut through the middle of the breast to separate. You can also use kitchen shears to cut through the skin and breast to separate, then use the knife to cut through the breastbone.
- Cut the breasts in half (optional). Place the breasts skin side up on the cutting board and remove the bones if desired, then cut width-wise. You can also remove the bones for boneless chicken breasts and even remove the chicken tenders to save for another use.
- Store your cut chicken in an air tight container in the refrigerator and use within 3 days, or freeze for up to 3 months.
Notes
- Pro tip: Use a very sharp knife for best results. If you’re not comfortable using a knife, kitchen shears are a great option as well!
- Locating the various joints are essential to cutting through the chicken parts quick and easy. If it’s difficult to cut through, you are not cutting through the joint.
- Consider purchasing a double pack of organic whole chickens at Costco and break them down at the same time. This saves money and time, and you can portion the chicken out for upcoming recipes.
- Save the neck and backbone to make homemade chicken stock. Store them in zip top bags in the freezer for up to 3 months until you’re ready to make stock!
Nutrition
Nutrition is estimated using a food database and is only intended to be used as a guideline for informational purposes.
